

Have you ever taken a great photo, but it looked dull on your screen? The lighting might be bad. The colors might look washed out. This is where photo editing comes in. Adobe Lightroom is one of the best tools for this job. It is a powerful photo editor used by beginners and professionals alike. You can use it on your computer or your phone.
Many people start editing on their phones. Some users look for extra features without paying. They might search for a Lightroom Mod APK to unlock premium tools for free. Other users just want the basic, official app. They will search for the standard Lightroom APK to install on their Android device. No matter which version you use, the tools work the same way. Learning the basics will change how your photos look forever.
This guide will teach you how to use Adobe Lightroom. We will keep it simple. We will explain the tools step by step. By the end of this article, you will know how to make your photos stand out.
Key Concepts and Definitions
Before you start editing, you need to know the terms. Lightroom has many sliders and buttons. These terms might seem confusing at first. Let’s break them down into simple words.
Exposure
Exposure simply means brightness. If your photo is too dark, you increase the exposure. If your photo is too bright, you lower the exposure. It is the first thing you should fix in any photo.
Contrast
Contrast is the difference between light and dark areas. High contrast makes darks very dark and lights very light. It makes a photo look bold. Low contrast makes a photo look soft and grey.
Highlights and Shadows
Highlights are the brightest parts of your image. This includes the sky or bright lights. Shadows are the darkest parts. You can adjust them separately. For example, you can make shadows brighter to see details hidden in the dark.
Whites and Blacks
These sliders control the extreme bright and extreme dark points. They help set the true black and true white in your image.
White Balance (Temp and Tint)
White balance makes the colors look natural. “Temp” stands for temperature. You can make an image look warm (yellow/orange) or cool (blue). “Tint” adds a green or pink tone. You use this if your photo has weird colors from indoor lights.
Saturation and Vibrance
Both of these control color intensity. Saturation boosts every single color in the photo. If you use too much, people will look orange. Vibrance is smarter. It only boosts dull colors. It protects skin tones so people look normal.
Presets
Presets are saved editing settings. Think of them like filters. You click one button, and it changes the light and color of your photo instantly.
Main Discussion: The Step-by-Step Editing Process
Now that you know the terms, let’s edit a photo. A good editing process follows a specific order. This helps you avoid making mistakes. Here is the best way to edit a photo from start to finish.
Step 1: Import Your Photo
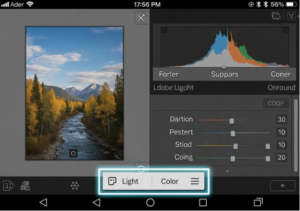
First, you need to bring your photo into Lightroom. Open the app. Click the blue button with a plus sign. Choose a photo from your camera roll. Once it is in Lightroom, click on the photo to open the editing screen.
Step 2: Crop and Straighten
Do not fix the colors yet. Fix the framing first. Click the “Crop” tool. Is the horizon crooked? Use the straighten slider to make it flat. Is there useless space on the sides? Drag the corners to cut it out. Cropping helps people focus on the main subject of your photo.
Step 3: Adjust the Light
Click the “Light” tab. This is where the magic happens.
- Fix Exposure: Make the overall image bright enough.
- Fix Contrast: Add a little bit of contrast so the photo does not look flat.
- Tweak Highlights: Bring the highlights down. This brings back details in bright skies.
- Tweak Shadows: Bring the shadows up. This shows details in dark areas.
Step 4: Adjust the Color
Click the “Color” tab.
- Set White Balance: Does the photo look too blue? Move the Temp slider to the right (yellow).
- Add Vibrance: Increase the vibrance to make the colors pop.
- Color Mix: Lightroom has a special tool called Color Mix. It lets you change specific colors. For example, you can make only the blue sky brighter without changing the green grass.
Step 5: Add Effects
Click the “Effects” tab. This adds texture to your photo.
- Texture and Clarity: These sliders make the details sharp. Use a little bit of clarity to make a landscape look crisp. Do not use too much on faces, or it will make the skin look bad.
- Dehaze: This is a great tool. It removes fog or smoke from a photo. It makes the sky look clear.
- Vignette: This darkens the edges of the photo. It helps pull the viewer’s eye to the center of the image.
Step 6: Sharpen the Details
Click the “Detail” tab. Most digital photos need a little sharpening. Move the sharpening slider up slightly. This makes the edges in your photo look clean. There is also a “Noise Reduction” slider. If your photo is grainy because you took it in the dark, this slider will make it smooth.
The Challenge of Over-Editing
One big challenge for beginners is doing too much. It is easy to slide everything to 100%. This makes the photo look fake. It is called “over-editing.” The goal is to make the photo look better, not unnatural. A good rule is to edit the photo, then pull the sliders back down by 10%. Less is usually more.
Factors Influencing Photo Editing
Editing is not just about moving sliders. External factors change how you edit. You need to understand these factors to get the best results.
1. Screen Brightness and Quality
Your phone screen changes how a photo looks. If your phone brightness is low, you might edit the photo to be too bright. Always edit with your screen brightness at 75% or higher. Also, turn off “Night Shift” or “Eye Comfort” modes. These modes make your screen yellow. They will ruin your color editing.
2. The Quality of the Original Photo
You cannot fix a terrible photo. If a photo is completely black or totally blurry, Lightroom cannot save it. The better your starting photo is, the better your final edit will be. Always try to get good lighting when you take the picture.
3. Current Social Media Trends
Editing styles change over time. Five years ago, bright and highly saturated photos were popular. Today, people like dark, moody, or film-like photos. If you post on Instagram, you might edit differently than if you print a photo for your wall. Pay attention to what styles look good to you.
Benefits and Importance of Lightroom
Why should you use Lightroom? Every phone comes with a free photo editor. Instagram has filters. So, why download a new app? Here are the main benefits.
Non-Destructive Editing
This is the biggest benefit. Lightroom is “non-destructive.” This means it never ruins your original photo. No matter how many edits you make, you can always click “Reset.” Your original photo is perfectly safe. Built-in phone editors sometimes overwrite the original file forever.
Advanced Color Control
Basic editors let you change the overall color. Lightroom lets you control single colors. If a red car is too bright, you can lower the red color only. The rest of the photo stays the same. This gives you total control.
Batch Editing
Imagine you take 50 photos at a birthday party. They all have the same bad lighting. In Lightroom, you can edit one photo. Then, you can copy those settings. You can paste them onto the other 49 photos instantly. This saves you hours of work.
Cross-Device Syncing
If you use the official Adobe Cloud, your photos sync. You can start editing on your phone while on the bus. You can finish editing on your computer at home. The edits update automatically.
Tips and Best Practices
To become a Lightroom pro, you need to practice. Here are some simple tips to help you improve faster.
Tip 1: Shoot in RAW Format
Most phones save photos as JPEGs. A JPEG is a compressed file. It throws away a lot of color data. Try changing your phone camera settings to shoot in RAW. A RAW file saves all the light and color data. It gives you much more power when editing in Lightroom.
Tip 2: Study Other People’s Edits
Look at the photos you like online. Ask yourself why you like them. Are they bright? Are they dark? Are the greens pulled down? Try to copy that style in Lightroom. This is the best way to learn how the sliders work.
Tip 3: Create Your Own Presets
Once you find an editing style you love, save it. You can create your own preset in Lightroom. Next time you edit a similar photo, just click your preset. It will do 90% of the work for you.
Tip 4: Watch the Skin Tones
When you edit a photo with a person in it, look at their face. It is easy to make skin look orange, red, or grey. Always check the skin tones after you adjust the colors. Use the “Color Mix” tool to fix the orange slider if the skin looks wrong.
Tip 5: Step Away from the Screen
When you stare at a photo for too long, your eyes get tired. You lose track of what looks natural. Edit a photo, then close the app. Wait ten minutes. Look at the photo again. You will instantly see if you made it too bright or too colorful.
Conclusion
Learning Adobe Lightroom does not have to be hard. It is simply about understanding light and color. We covered the basic terms like exposure, contrast, and highlights. We walked through a simple step-by-step process to edit your photos. We also talked about why this app is better than basic phone editors.
Remember, photo editing is an art. There is no single “correct” way to do it. The sliders are just tools. You are the artist. Do not be afraid to play around. Move the sliders all the way up and down to see what they do. Make mistakes and try again.
Start by importing your favorite photo today. Adjust the light first. Then, play with the colors. Keep your edits simple and natural. With a little bit of practice, you will transform your everyday pictures into amazing pieces of art. Enjoy your editing journey!